Items are as important as armor and weapons
Learn how to forge armor and weapons in Monster hunter rise it is an essential skill. Equally important is understanding how to create objects. While your gear will help you complete a hunt, items are what you really need to survive.
In this Monster Hunter Rise guide, we will show you how to craft items. You can create objects one at a time from the creation menu or create them automatically with the automatic creation option. We will also explain how to instantly replenish your stock of items with the push of a button.
You might be interested in:
- Monster Hunter Rise - Guide: Tips for getting started
- Monster Hunter Rise - Guide: How to create new weapons and armor
- Monster Hunter Rise - Wyvern mount guide, here's how to ride a monster!
How to create objects
To start crafting items, press the plus (+) button to bring up the menu. From there, select Creation. This option has four categories:
- All the objects you can create
- Healing and support articles
- Traps and offensive tools
- Ranged Weapon Ammo and Weapon Covers
By pressing the L and R buttons, you can find all the elements that can be created. If an object has bright white text, it means it can be created. If the name of an object is gray, it means that you do not have the necessary creation resources.
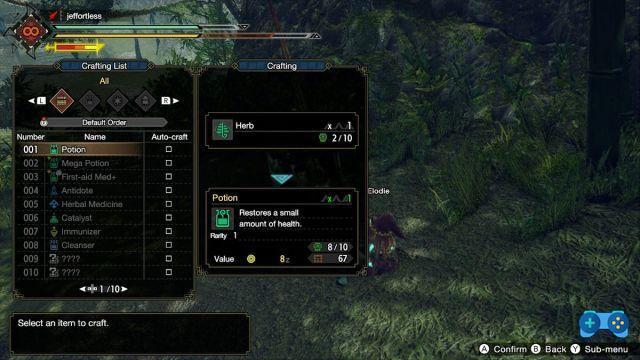
To create an object, select it and choose one of two options: create or quantity to create.
The second option is great if you want to stock up on important items like potions and antidotes. However, while it's possible to create items in bulk, it's still a chore to get into the crafting list every time you get new assets. Thankfully, there is a way to create objects without lifting a finger.
How to self-create objects
Instead of creating objects in bulk to make sure you never run out of important objects, use the auto-create option. When an item is set to auto-create, your character will automatically do what you choose to do whenever that item's required resources are available in your inventory.
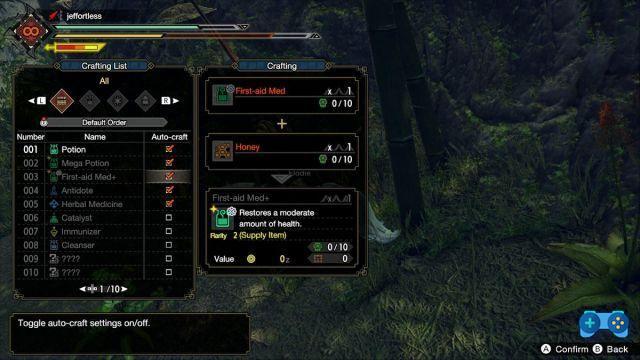
To automatically create an item, press the Plus button and select your crafting list.
Highlight the item you want to create automatically, then press the Y button to enter the submenu. With the submenu open, select the auto-craft settings. After choosing this option, the cursor will move to a column to the right which will allow you to select the auto-create box next to the selected object and any other objects you want to auto-create.
Just because you've automatically created an item doesn't mean it immediately shows up in your inventory during every hunt. You have to manually restock your items.
How to replenish inventory
At the start of each hunt, you will always start at the camp next to a supply crate and the tent. To restock the items, enter the tent and select the item box option. Then choose Manage Items followed by Transfer Items.
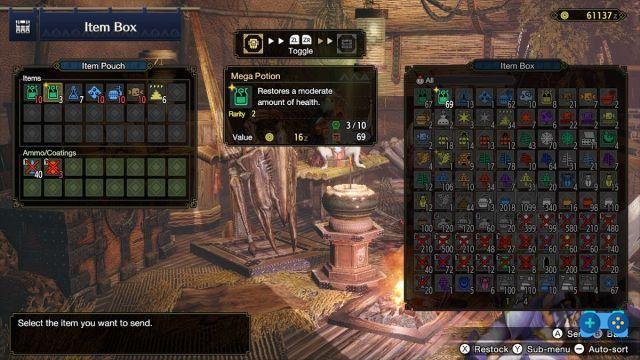
From this screen you will see two sets of objects. The window on the left shows all the items you have with you in the. The large window on the right is the item box and contains all the items and resources you have received as a reward from the hunt, as well as those you have collected and created. To replenish the item bag from the item box, press the X button.
In this way it will be possible to top up your inventory up to a maximum of 10 pieces for each item.
If you have created items automatically during all your hunts, you will eventually develop a large amount of items in the item box. Whenever you access the item box, whether from the village or a tent at the start of a hunt, you can quickly restock all your valuables to make sure you are well equipped to take on the next monsters in the game.
Deprecated: Automatic conversion of false to array is deprecated in /home/soultricks.com/htdocs/php/post.php on line 606


