After using other email clients for a long time, you decided to give it a try Outlook from Microsoft and you were so happy with it that you made it your default mail program. For this reason, you intend to configure the software to automatically insert, at the end of each message, a personalized signature that can identify you. The problem, however, is that you do not have the faintest idea how to deal with it, so you opened Google to search for information on it, ending up on this guide of mine.
Well, I am happy to inform you that you are in the right place, at a time that could not have been better: in fact, below I intend to explain to you in detail. how to insert signature in outlook, both within the program for Windows and macOS (Outlook 365) and in the Web Mail service of the same name and in the Outlook apps for Android and iOS. I assure you that this is really a breeze.
Just a small clarification before starting: if you use e-mail using several different tools (e.g. both in the Outlook 365 program and in Outlook Web), you will have to configure the signature separately on each of them, since the signature is not synchronized automatically, at least for now. Having made this dutiful clarification, there is nothing left for me to do but wish you a good read and a good job.
Index
- How to insert signature in Outlook 365
- How to insert signature in Outlook.com
- How to insert signature in Outlook on Android
- How to insert signature in Outlook on iPhone
How to insert signature in Outlook 365
You've signed up for an Office 365 subscription, downloaded and configured Outlook 365 to manage your e-mail, but you just don't know how to insert the signature into the program? Then this is the section of the tutorial that suits you best: below, in fact, I intend to explain how to achieve this goal is on Windows that of MacOS. Please note that the instructions are valid both for setting up Outlook subscription accounts and for setting up any other email address within the program, including the free ones provided by Microsoft (@outlook.com, @live.it, @ msn.it, @hotmail.it and so on).
Insert a signature in Outlook for Windows
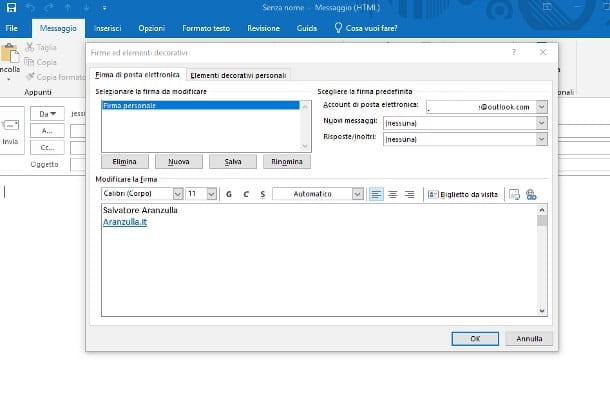
To configure the signature in Outlook via Windows, first open the program by calling it from Start menu (l'icona a forma di pennant located in the lower left corner of the screen), then click the button for create a new e-mail message, located in the upper left corner of the tab Home, then, click on the button Company and then on the voice Firm… placed in the menu that opens.
If everything went well, the signature management screen should open: click on the button New signature located in the aforementioned window, indicates a name with which to identify it (e.g. personal signature), click on the button OK and specific the e-mail account for which to use it, by acting on the appropriate drop-down menu. To automatically sign all sent messages, select the signature name previously defined by the drop-down menus New posts e Replies / forwards.
Once this is done, type the signature you want to use in the text field in the box Change the company: if necessary, you can use the formatting tools (bold, italics, underline, font and alignment) located at the top of the box to "improve" your signature. Alternatively, you can use an Office program (eg. Word) to insert more complex elements, such as numbered lists, and then copy and paste it inside the box.
If you wish insert a logo signature in Outlook, adding your company logo to what was written previously, move the cursor to the position where you want to add the image, click on the button Insert image (Quello forma di panel with monitor, located near the button Biglietto gives visit) and select the logo of your interest from the proposed panel.
Insert a signature in Outlook for Mac
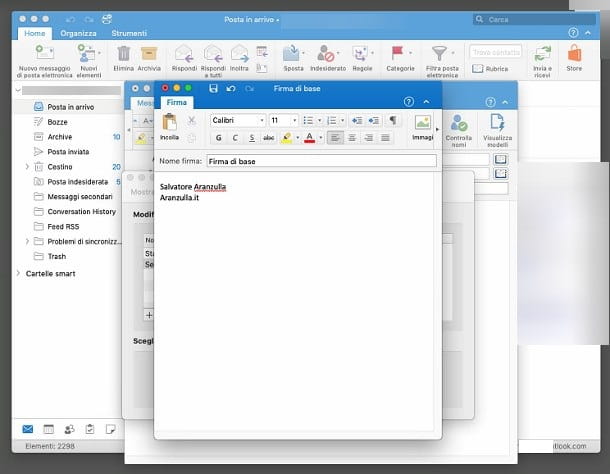
The steps for insert a signature in Outlook for Mac are almost the same as those already seen for Windows: after opening the program and choosing the box in which to intervene, click on the button to create a new e-mail message and, once the next window is open, press the button Company located at the top right (if you are using the reduced view, you may have to click on the button several times [>] located on the far right, until you see a button identified by the icon in the shape of sheet with pen), then click on the entry Edit Companies… placed in the menu that opens.
At this point, pigia sul pulsating [+] located just below the box name firm, indicate the name with which to identify the signature you are about to create in the box name firm attached to the window that appears later, then use the box below to type in the content most appropriate for you, possibly helping you with the formatting keys placed at the top.
It is your intention insert a logo signature in Outlook for Mac, click on the place in the signature where you want to insert the logo, press the button Insert image (the one in the shape of a picture) and select the logo using the Finder panel that is proposed to you. When you are done, click on the button in the shape of floppy disk located in the upper bar of the window to save the signature just created and close the edit window.
Next, select the signature you created earlier from the box name firm and, using the drop-down menu, indicate theaccount mail for which to use it; if you intend to sign automatically for i new messages outgoing and / or for replies and forwarding of existing emails, specify the name of the same in the drop-down menus provided. Finally, simply close the signature management window and that's it!
If you have chosen not to automatically apply the signature to outgoing messages, you can insert it if necessary by clicking on the button Firm attached to the window for creating a new message and selecting the name of the signature of your interest from the menu that is subsequently displayed on the screen.
How to insert signature in Outlook.com
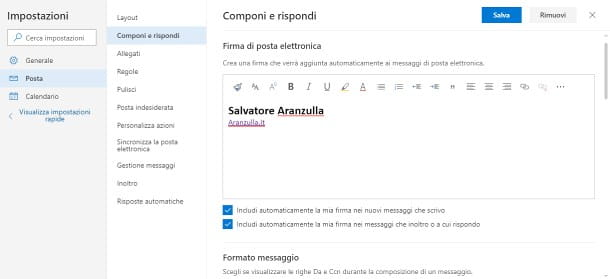
As for Outlook.com, the web version of the e-mail service provided by Microsoft, entering your signature is just as simple as provided by the portal interface options.
After logging in to your e-mail box, click on the button in the shape of aGear located near your name, in the upper right corner, and select the link View all Outlook settings, located in the lower part of the panel that is proposed to you.
At this point, click on the tabs Mail e Dial and answer attached to the screen that appears superimposed and type the signature to be used in the box e-mail signature. If necessary, you can customize and refine the text using the formatting tools at the top of the box itself. When you are done, indicate if include the signature in the messages you write and / or include your signature in any messages you forward or reply to intervening on the appropriate boxes and, subsequently, presses the button Save which is located at the top.
The game is practically done: if specified above, the signature will be automatically affixed to the emails you send from the mailbox in question, otherwise you can enter it manually by clicking on the button (...), located in the upper right corner of the message composition screen and selecting the item Company from the menu that appears immediately after.
How to insert signature in Outlook on Android
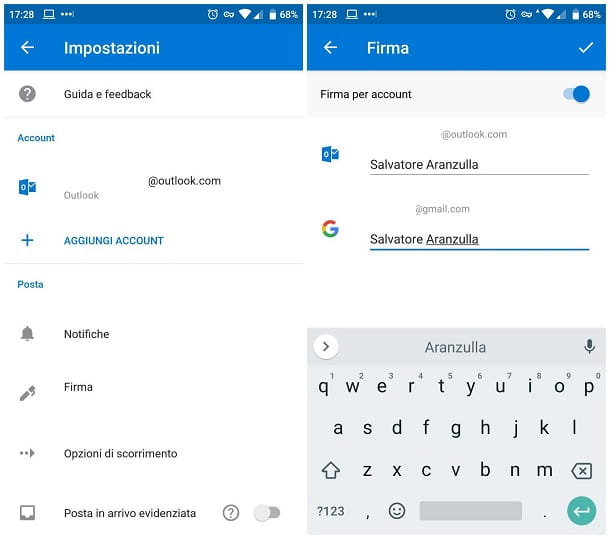
Insert the signature in Outlook on Android it's really a no-brainer! Before proceeding, however, I want to warn you that the Outlook app does not currently provide the possibility to format the text directly from the insertion screen, nor to specify whether to insert it or not: the signature is automatically affixed to all emails in exit.
All clear? OK, then let's proceed. First, launch the Outlook for Android app, make one swipe from the left to the center of the screen (or tap the button ☰ located at the top left) to access the application menu, then tap the button (I.e. located in the latter.
Then touch the item Company and specify, in the appropriate text box, the signature to be included in outgoing emails. If you've set up multiple accounts within the app and want to specify a different signature for each one, move to ON the levetta Company per account and type the signature to be applied in the proposed fields. When you're done, tap the sign of check, located at the top right, to save the changes.
How to insert signature in Outlook on iPhone
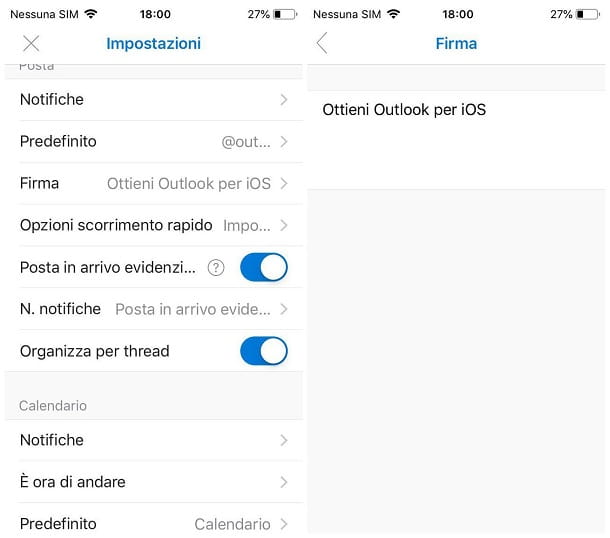
The procedure for insert signature in Outlook on iPhone it is very similar to the one seen previously for Android: after starting the Outlook app for iOS, touch the item Incoming mail (located at the top) to display the app's main menu, then press the button (I.e. and on the voice Company attached to the proposed panel: type the signature you want to use in the appropriate text field or, if you want to specify a different signature for each configured account, activate the lever in advance Company per account.
The modification is instantaneous and does not require additional operations: once you have finished entering your signature, press the buttons < e X placed at the top left, to return to the mailbox, or do one twice in a row swipe from the left to the center of the screen.
Deprecated: Automatic conversion of false to array is deprecated in /home/soultricks.com/htdocs/php/post.php on line 606


