One of the features that makes the Mac unique and versatile is the ability to easily boot any operating system, plus of course OS X.
If we are dealing with the Windows world, perhaps for work needs, and we need to use the Microsoft Office package, we can avoid buying it in the Apple App Store, using Boot Camp, which allows us to install Windows 7 on a separate partition, which is exactly like having a normal PC, but with Mac hardware.
This is undoubtedly the best solution not only for Microsoft products, but also for video games, but there is a limit to all of this: if we need to switch from OS X to Windows often, perhaps we should use a "virtual machine", or an application that allows you to manage different operating systems without forcing us to reboot.
Parallels Desktop 7 (for € 79,99 at www.parallels.com) allows us to install Windows 7 as a virtual machine. But Parallels Descktop is not limited to the Microsoft system, it also allows you to install various versions of Linux and other systems. It also allows you to create a "boxed" version of OS X, which is a virtual installation of the operating system to be used for experiments, such as installing a program that we fear could do damage or create conflicts.
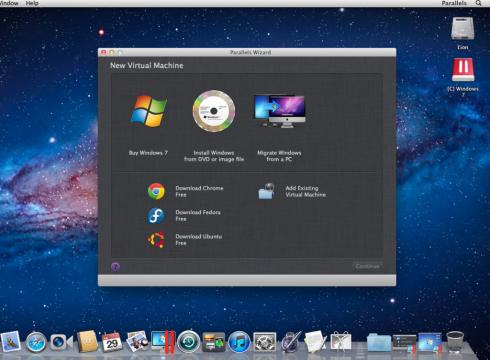
But let's see how Parallels Desktop is used:
After installing it, when you start Parallels Desktop you are greeted by the Parallels Wizard which lists your options, including the ability to migrate all files and settings from a PC, useful if you're new to the Mac. You can open this menu whenever you want on Parallels Desktop> File> New. From here you can install Windows 7 or whatever system you want.
Unlike Boot Camp, Parallels Desktop 7 does not need a separate partition to put Windows on the Mac. Create a "Virtual Machine" application for each guest system on your Mac. To install Windows choose the location of the installer: DVD, USB key or ISO file. Remember to backup your Mac for safety.
After entering the Windows product key, Parallels Desktop will ask you if you want Windows applications to work like a Mac, with files and folders shared between the two systems, or if you want Windows to work like a PC, with the system and its applications running within a specific window.
Once Windows has been successfully installed, you will need to update it to make sure it is stable and secure. In Windows 7 select Start Menu> Control Panel> System and Security> Windows Update> Check for Updates. Now you just have to wait for Windows to download service packs and patches.
After everything is up to date you can start using Windows on your Mac. To make it easier to share a file and folder between the two, go to Parallels Desktop> Virtual Machine> Configure> Options> Sharing.
You can give Windows access to your folder Home, to all disks, to custom folders, or to nothing.
Parallels Desktop 7 gives you four different options for viewing your virtual machines:
- modality Windows.
- modality Screen full.
- modality Mode showing a transparent window for control purposes.
- modality Coherence which allows Windows applications, windows and menus to appear smoothly in OS X.
If the look of Windows is too flashy for your taste, you can change it using the MacLook. Replaces some colors and navigation elements with their OS X equivalent for a smoother experience. To enable or disable MacLook, goes his Parallels Desktop> View> Use MacLook.
With Parallels Desktop we have the ability to boot another version of Lion within the existing OS X Lion installation. This will allow you to test compatibility on your Mac applications. In addition, each virtual machine on the Mac includes a menu Configure, Parallels Desktop> Virtual Machine> Configure, which allows you to change hardware and software settings. You can dedicate more RAM or processor power to the program, or let Windows handle email and browsing tasks instead of OS X. The menu Configure also includes the option to backup your virtual machine using time Machinewhich is handy if you're worried about running multiple OSs side by side.
Deprecated: Automatic conversion of false to array is deprecated in /home/soultricks.com/htdocs/php/post.php on line 606


