You just bought your first one iPhone. You are delighted with your new technological jewel but, not being very familiar with smartphones and other electronic devices yet, you are afraid of not knowing how to correctly set up the Apple home telephone.
Don't panic! I understand that having a latest generation smartphone in your hands, with all those functions, can make you a little uncomfortable, but I assure you that using and configuring an iPhone is very easy even for those who don't have a good relationship with technology. Do not you believe it? Then let me demonstrate it to you via this tutorial at how to set up iphone. Then let me know if you changed your mind about it!
So, may we know what are you still doing standing there? Come on: make yourself comfortable, take all the time you need to concentrate on reading the next paragraphs and, more importantly, try to implement the "tips" that I will give you. There's nothing left for me to do but wish you a good read and good luck for everything!
Index
- How to set up new iPhone
- How to set up iPhone with PC
- How to set up Internet on iPhone
- How to set up iCloud on iPhone
- How to set up mail and contacts on iPhone
- How to set up iPhone unlock
- How to set up Siri on iPhone
- How to customize iPhone
- How to set up iPhone for kids
- How to set up iPhone like new
- In case of dubbi or problem
How to set up new iPhone
First, let's see how to do it initial setup of the iPhone, then how to carry out all those necessary procedures after having extracted the "iPhone by" from its sales package.
First enter the SIMs. inside it, bearing in mind that you can proceed with the initial configuration even in its absence, but entering it immediately and then continuing is more convenient.
So take it metal paper clip placed on the white card found in the iPhone box, insert it into the hole present on the right side of the device, take the Nano-SIM and wedge it into hers housing. To conclude the operation, insert the drawer in the SIM compartment and that's it. More info here.
How to do the initial setup of iPhone
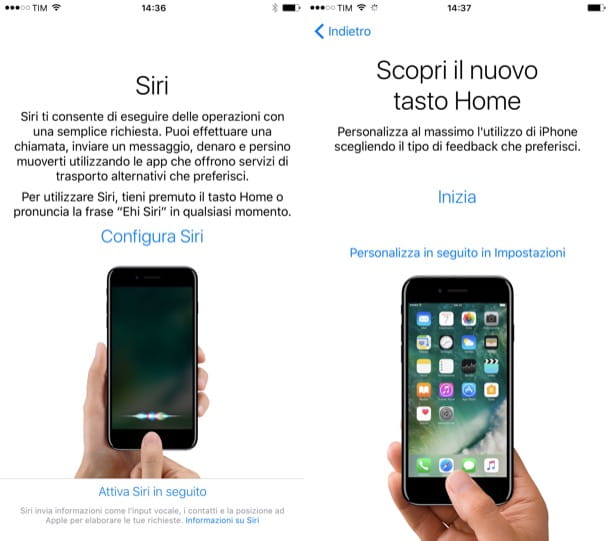
After turning on the iPhone for the first time, you simply have to follow the guided procedure that appears on the screen to carry out the iOS initial setup.
Then choose the language in which to use the device and the Country where you are, then tap on the entry SIM card and type il PIN unlock (if required). Now choose the reference shape between Female, Male o Neutral.
Next, try to connect to one WIFI network, wait for the configuration to complete and set the Face ID (or the touch ID) by following the instructions that are shown on the screen. Then choose the unlock code to set to secure your phone, decide whether to configure the device as newis restore data from iCloud or iTunes backups or whether to import data from one Android smartphone.
Then, log in with yours Apple ID or create one at the moment by filling out the appropriate form, accept the terms and conditions, then choose whether or not to consent to the sharing of usage statistics of the device with Apple and with third-party developers.
All you have to do is configure Crab, Apple Pay, iCloud Keychain (which stores and syncs passwords with Safari) e Usage time, and then start using your new mobile phone.
For more information on the procedure that I have briefly described in the previous lines, take a look at this support page on the Apple website: there you will find other useful information on what to do.
How to set up new iPhone with old
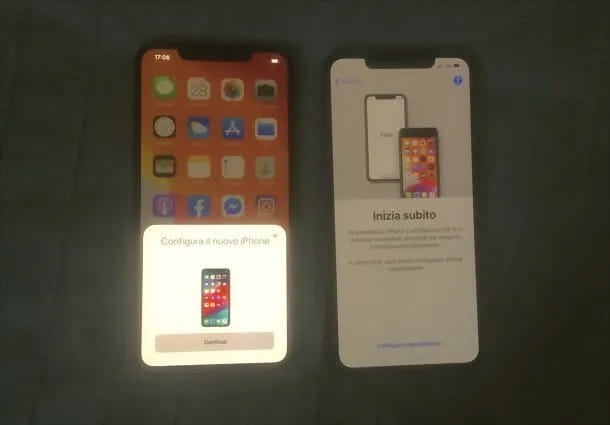
If you have decided to change iPhone models and want to perform the quick setup, as I mentioned earlier, you can select it during the initial setup of your device via the screen Start now, provided that the old iPhone is connected to Wi-Fi and Bluetooth connectivity is turned on.
In this case, just physically bring the new device close to the old iPhone and follow the instructions on the screen — which essentially consist in accepting the configuration request for the new device by pressing the button Continue and framing with the camera of the new iPhone theanimation present on the display of the old device. Once this is done, you just have to wait for the transfer to complete, that's all!
How to set up iPhone from Android
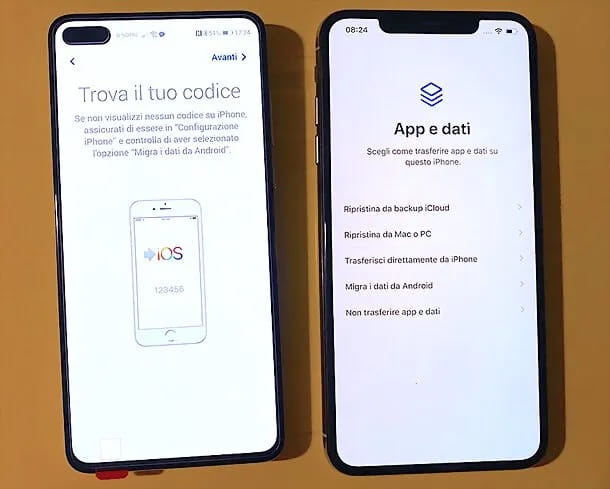
Want to transfer as much data as possible from your old Android smartphone to your new iPhone? Then you will be happy to know that the app was developed by Apple Go to iOS, useful precisely to facilitate this transfer of information that was once almost impossible.
By installing Switch to iOS on Android, after performing the initial iOS setup as seen above and arriving at the screen Apps and Data, you will be able to select the item Migrate data from Android and pin the Numerical code to be inserted in the Switch to iOS app of Android. After that, you just need to select the items to copy and wait for the data transfer to be completed, and then finish the initial iOS setup.
How to set up iPhone with PC
If you want, you can also configure your iPhone via your computer, using iTunes on PC Windows and Finder in MacOS. Below you will find out how.
How to set up iPhone from iTunes
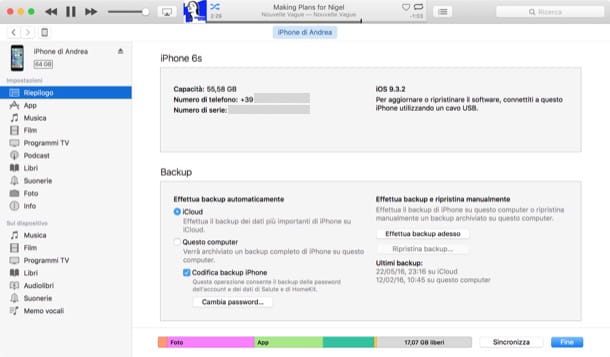
As I mentioned, it is possible set up iPhone using iTunes, Apple's multimedia program for Windows that allows you to manage iOS devices from your computer and synchronize data with them.
During the initial setup phase, on the iOS screen call Apps and Data, you can press on the option Restore from Mac or PC, useful for restoring your phone using a backup on your computer.
To learn more, you can read my tutorials on how to connect iPhone to PC, how to create backups with iTunes (for creating iPhone backups on computer) and how to sync iPhone with iTunes (for syncing videos, music and other files between PC and iPhone).
In general, after connecting the iPhone to the PC, opening iTunes and selecting the iPhone, you must press on the card Riepilogo and select the key Restore backup. More info here.
How to set up iPhone with Mac
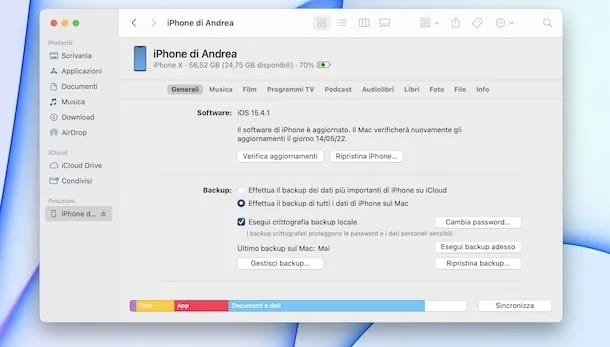
Also through MacOS it is possible to carry out an operation very similar to that seen previously with iTunes. The only substantial difference is that you must use the Finder which owns the built-in iTunes functions.
For the rest, all you have to do is press the button Restore backup, select the chosen backup from the list shown on the screen and start the configuration. In any case, to find out more, you can read my in-depth analysis on the subject.
How to set up Internet on iPhone
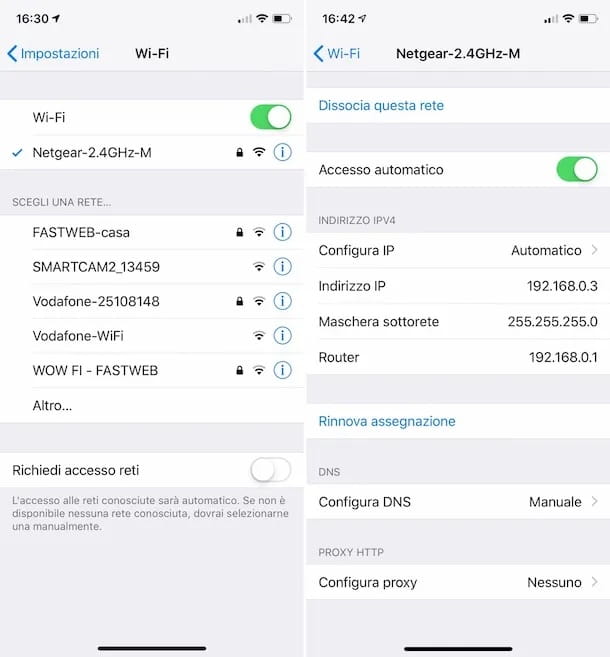
Now let's see how to set up internet on iphone, so as to be able to connect the smartphone to a Wi-Fi network, configure the data network of your operator and take advantage of the hotspot function.
As for connecting to a network Wi-Fi, if you have not done so during the initial configuration, go to the menu Settings> Wi-Fisposta su ON l'interruttore situato in corrispondenza della dicitura Wi-Fi present in the screen that opens, tap on network name which you intend to connect to, type the Password access in the appropriate text field and tap on the item Log in.
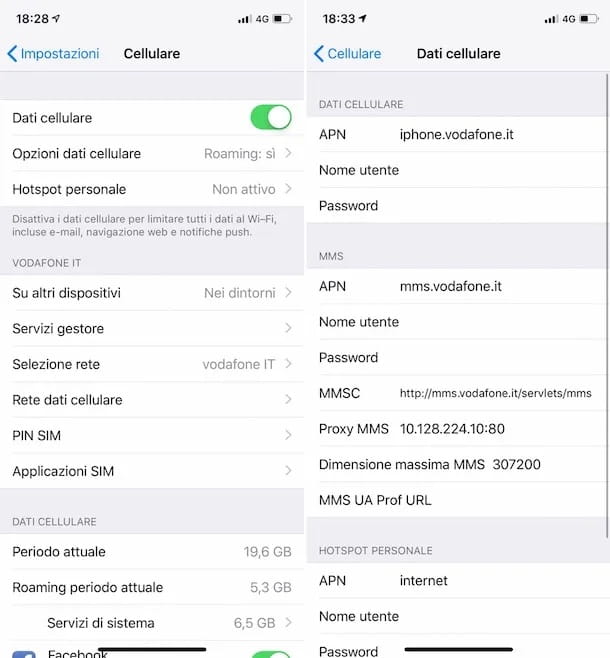
With regard to the data network, however, you need to correctly configure the APN on your iPhone using the ones suggested by your carrier. To do this, go to the menu Settings> Cellular and move up ON the switch next to the item Cellular data.
At this point, to "manually" configure the data network settings, select the item Cellular data network located at the bottom of the screen you are in and, once the connection configuration panel is displayed, set the APN that the iPhone must use to connect to your operator's network by following the instructions provided by TIM, Vodafone, WINDTRE e Iliad. If you want more information on how to set up the Internet on iPhone and how to connect iPhone to the Internet, feel free to consult the guides that I have linked to you.
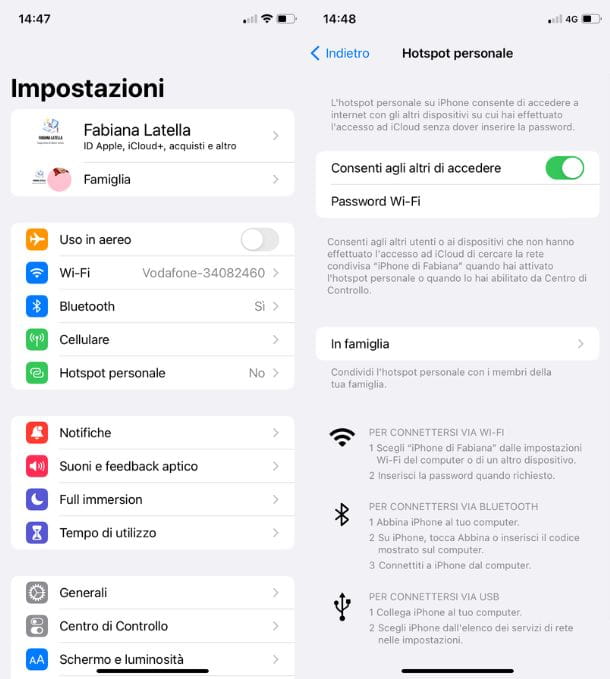
Finally, if you want to use the iPhone as a portable modem you can take advantage of the hotspot function of your device. To activate it, go to the menu Settings> Personal Hotspot and move up ON the switch located on the screen that opens.
After that decide whether to enable hotspot via Wi-Fi, Bluetooth or by USBby selecting the option you prefer. If you want to change the default password to connect to the Wi-Fi network generated by the iPhone, tap on the item Wi-Fi Password located on the screen you are in and provide, in the appropriate form, the new access key you want to use.
For more information on how to set up Internet on iPhone and how to use hotspot on iPhone, I suggest you take a look at the guides I just linked to you.
How to set up iCloud on iPhone
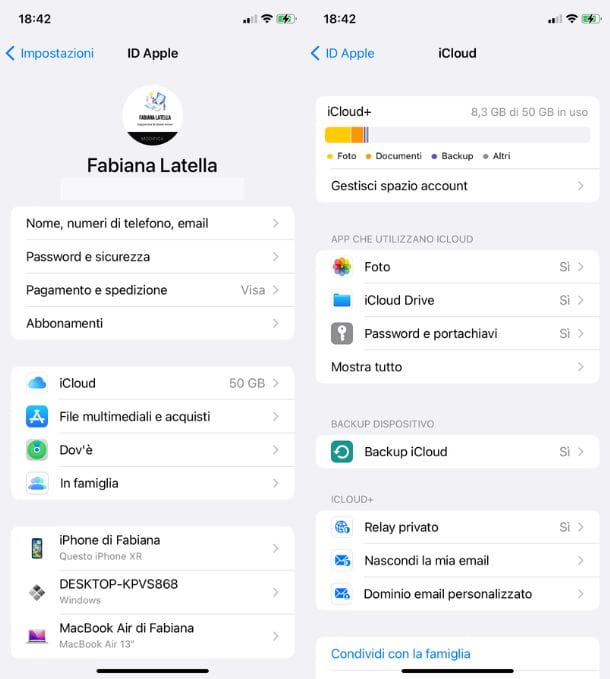
We now come to iCloud setup, Apple's cloud service that allows you to store all the data on your devices and synchronize them automatically on all devices associated with your Apple ID.
When you turn on your iPhone for the first time, and then during its initial setup, you are asked to activate iCloud by associating the device with your Apple account. If you skipped this step and want to fix it, go to Settings > [Your Name] > iCloud and make sure that next to the various items there is the wording Yes and that the switch levers, which can be reached by tapping on the item Show all, are moved up ON.
Through iCloud you can also create gods backup of your iPhone (for the reasons mentioned above, also in this case it is practically a must to subscribe to one of the paid plans of iCloud, given the "weight" that backups can have). To activate the iCloud backup function, go to Settings > [Your Name] > iCloud > iCloud Backupsposta su ON the switch located near the wording Back up iCloud and then tap on the item Back up now. From now on, iCloud backup will be performed automatically whenever the iPhone is connected to a Wi-Fi network and charging.
For more information on how to sync iCloud and how iCloud works, check out the insights I just linked to you.
How to set up mail and contacts on iPhone
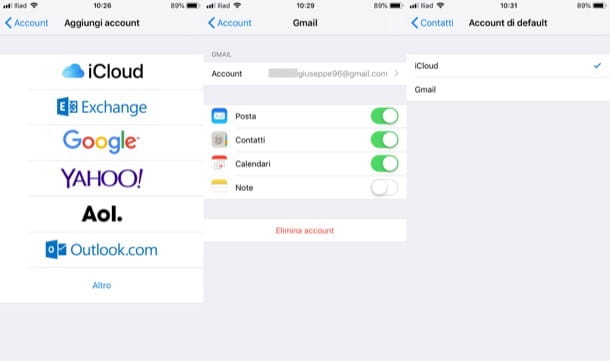
Now let's talk about how to set up e-mail and contacts on iPhone. If you want to set up an email account other than the default iCloud account in Settings> Mail or Settings> Contacts and tap on the items Accounts > Add account.
On the screen that opens, decide whether to add an account iCloud, microsoft Exchange, Google, Yahoo!, AOL, Outlook.com, or tap on the entry Other to configure an account of other providers using the POP3/IMAP parameters provided by the latter. Then log in to your account (or provide the POP3/IMAP parameters provided by the provider), choose the elements of the address you have configured that you wish to synchronize with your device (eg. Mail e Contacts) and tap on the item Save, located at the top right.
To set the added account as default, go to Settings> Mail (regarding email sync) or in Settings> Contacts (for contacts), move up Account di default and, in the screen that opens, select the account you intend to use as default. More info here.
Note: if you have added a Gmail account, know that it is not possible to get push notifications of messages received in Apple Mail. To do this, you need to use third-party apps, such as Gmail, Outlook or Airmail.
How to set up iPhone unlock
Let's go now to configure iPhone unlock (unless you have already done so during the initial configuration of the device). On iPhone X and later models you can configure the Face ID, i.e. unlocking via facial recognition, by going to Settings> Face ID and passcode, typing the unlock code of the iPhone and starting the relative setup wizard. More info here.
If you have an iPhone that has a Home button with touch ID, you can unlock your device using your fingerprint. To enroll a fingerprint and use it to unlock your iPhone, go to Settings> Touch ID and passcode, enter the iPhone unlock code and start the Touch ID setup by following the instructions that appear on the screen.
To activate the unlocking of the iPhone using the fingerprint, once you have registered one, you will need to make sure that the switch lever located next to the item Unlock iPhone sia spostata her ON. More info here.
As for the iPhone unlock code, if you want to change it, you have to go to the menu Settings> Face ID and passcode (o Touch ID and codice or Unlock code), tap on the item Change the code, enter the current code, provide the new one (by typing it twice) and wait for the setting to be saved. More info here.
How to set up Siri on iPhone
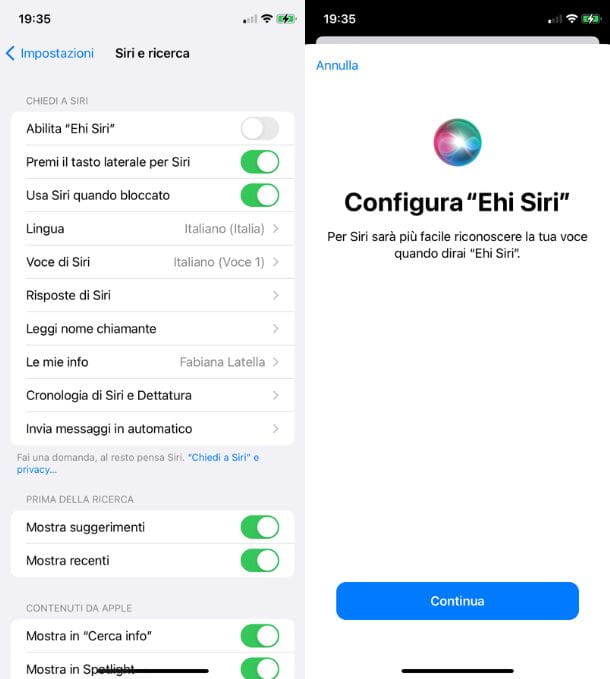
If you did not activate during the initial setup Crab, Apple's voice assistant, you can fix it at any time. To activate Siri, go to the menu Settings > Siri & Search and move up ON le levette relative alle opzioni Enable "Hey Siri", Press the side button for Siri e Use Siri when locked.
If you have decided to enable Hey Siri which allows you to invoke Siri via voice, to configure this feature, after moving on ON the relative switch, you must press the button Continue present in the configuration screen, pronounce the phrases that appear on the screen and tap on the item end.
I remind you that, once you have configured Siri, you can call it up by holding down the side button (or the Home button, on iPhones with a physical Home button) or using the voice command "Cow!". For more information on using Siri, don't hesitate to read the guide I just linked to you.
How to customize iPhone
After configuring the main settings of your "iPhone by", you would like to know how to personalize iphone changing its wallpaper, changing the position of icons on the Home screen and customizing ringtones? No problem: below you will find explained how to do it.
To change it background of the iPhone, go to the menu Settings > Wallpaper > Add new wallpaper, then start setting up your new lock screen via the various settings that appear. With the update to iOS 16, in fact, you can customize many more elements than in the past and choose whether to opt for a preset or to generate your screenshots from scratch. You will find exactly how to do it in my tutorial on how to change iPhone wallpaper, whether you have iOS 16 or a previous version.
If you want to customize the icon on the iPhone, then change their arrangement and organize them into folders, know that you can do it quite simply. For move icons, keep your finger pressed for a few seconds on one of them and select the item Change your Home screen from the menu that opens. Alternatively, continue to hold a little longer or (up only iOS 14 and later) hold down an empty spot on the Home screen for a few seconds. When you see that they all start to "dance", keep your finger pressed on the icon you want to move and drag it to the desired position. Then press anywhere on the screen or on the item end to save the changes made.
organize icons into folders, keep your finger pressed on an app icon, so that all icons on the Home screen start to "vibrate", drag an app icon onto another (you can also select multiple apps by continuing holding your finger down on an application and then single-tapping other icons). Then press on the entry end to save the changes made. Simple, right?
One is also available on iOS 14 and later app library, on the last page of the Home screen, which contains the list of all the apps installed on the phone automatically organized into folders. If you want, you can also view the apps only within the latter and not on the Home screen. For more information on how to move icons on iPhone and how to organize apps on iPhone, read the guides I just linked to you.
If you wish customize ringtones on iPhone because you want to set one other than the default one, go to the menu Settings > Sounds & Haptics and tap on one of the items related to Ringtone, Sooner SMS or the various types of warnings present. Then choose the ringtone of your liking (eg. apex, Top and so on) and that's it.
From section Store present on the screen you are in, you can tap on the item Ringtones on the iTunes Store, in order to go to the section of the iTunes Store where there are some third-party ringtones that can be purchased at quite affordable prices.
If you want, you can also import ringtones from your computer using iTunes or, again, using third-party apps that I told you about in my guide on how to customize iPhone ringtone.
How to set up iPhone for kids
Have you bought an iPhone for your child and want to know if there is the possibility of configuring it in a way suitable for children? So if the child in question has less than 13 years, you can create your own Apple ID with age-appropriate restrictions.
To proceed, using your Apple device, you can go to Settings > Family and press the icon oflittle man with the +, located at the top right. Then press on the entry Create a child account and follow the on-screen procedure to complete the operation by entering the child's data and a credit card, driving license or identity card present in Wallet to confirm your age.
Once the Apple ID for minors has been created, you can go and set it up on your child's iPhone using the quick procedure, by pressing the side button of the child's iPhone and bringing yours close to it. When the voice appears on your iPhone Set up new [device], tap the button Continue e premi sull 'icon of the minor previously added to the Family Sharing feature. At this point you just have to complete the procedure by setting the parental controls for Contacts, Usage time e Ask to buy (which you can also do at a later time, always via Settings > Family Sharing > [Children's Name]) And that's it.
How to set up iPhone like new
want set up the iPhone as newmaybe because you're going to sell it? Before carrying out this operation, which will delete all the data on the device, I advise you to make a complete backup of the data.
After that go to Settings > General > Transfer or Erase iPhone and tap on the item Initialize content and settings, in order to initialize the iPhone and return it to the factory state. You will then need to type the unlock code of the device and confirm your intentions, to proceed.
Once this is done, you simply have to wait for the reset to be completed. The procedure in question can also be done via iTunes. For more information on what to do, read this guide dedicated to the subject.
In case of dubbi or problem
If you still have doubts about the operations to carry out to best configure your iPhone, I strongly suggest that you contact the Apple customer service using one of the many channels among those available: telephone assistance, online assistance, social assistance or in-store assistance.
Deprecated: Automatic conversion of false to array is deprecated in /home/soultricks.com/htdocs/php/post.php on line 606


